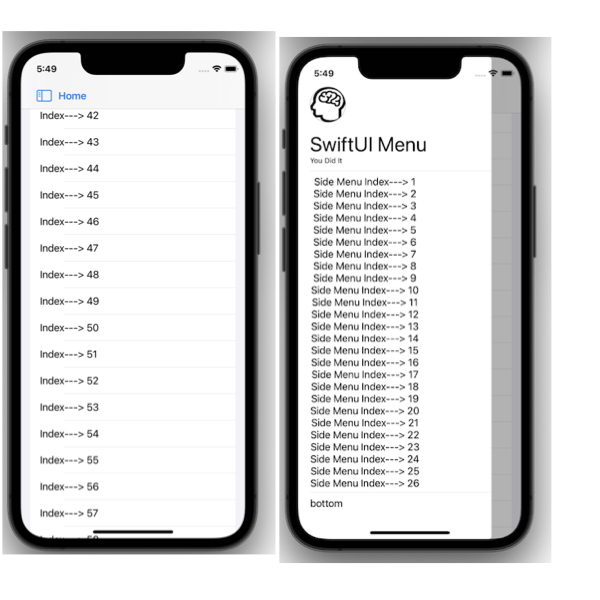
Hey Folks, In this tutorial i will show you Creating SideBar menu or hamburger menu in SwiftUI which supports Gestures as well.
We will Create Three classes
1. DashBoardView – Which represents Dashboard of the app with Hamburger Menu.
2. ViewModel – For Managing SideBar flag
3. SideBarView- The view which invokes when we trigger Hamburger’s icon
1. DashBoardView.swift
import SwiftUI

// Dashboard view with Hamburger Menu
struct DashBoardView: View {
    // 1: View Model For managing sideBar flag
    @StateObject var viewModel = ViewModel()

    var body: some View {

        ZStack {
            NavigationView {
                VStack(alignment:.leading) {
                    List {
                        ForEach((1...130), id: \.self) {
                            Text("Index---> \($0)")
                        }
                    }
                }
                .navigationBarTitle("", displayMode: .inline)
                // Setup Hamburger Icon On NaviationBar
                .toolbar {
                    ToolbarItem(placement: .navigationBarLeading) {
                        Button(action: {
                            self.viewModel.isMenuVisible.toggle()
                        }, label: {
                            HStack {
                                Image(systemName: "sidebar.leading")
                                Text("Home").font(.headline)
                            }
                        })
                        .foregroundColor(.blue) // You can apply colors and other modifiers too
                    }
                }
            }

            SideBarView()
                .ignoresSafeArea()
            // .background(Color.clear.edgesIgnoringSafeArea(Edge.Set.all))

        }.environmentObject(self.viewModel)
            .gesture(customDrag)
    }

    // Adding Drag Gesture - Swipe from Left with edge of $0.location.x < 200
    var customDrag: some Gesture {

        return DragGesture(minimumDistance: 5)
            .onEnded {
                if ($0.location.x - $0.startLocation.x) > 0 {
                    //print("rRight Swipe--->", $0.translation.width, self.viewModel.isLeftMenuVisible)
                    if $0.location.x < 200 && !self.viewModel.isMenuVisible {
                        //print("dsdsd",$0.translation.width, $0.location, UIScreen.main.bounds.width)
                        withAnimation {
                            self.viewModel.isMenuVisible.toggle()
                        }
                    }
                } else {
                    //print("Left Swipe ---")
                    if $0.translation.width < -100 && self.viewModel.isMenuVisible {
                        withAnimation {
                            self.viewModel.isMenuVisible.toggle()
                        }
                    }
                }
            }
    }
}
struct ContentView_Previews: PreviewProvider {
    static var previews: some View {
        DashBoardView()
    }
}- Create
ZStackwithNavigationViewas commonly we use to create SwiftUI View - We will be using
toolbarfuncfor designing Hamburger icon on thenavigationBar - Use
.ignoresSafeArea()to use entire area visible for Sidebar menu customDragis used for enable swipe from left to invokeSideBarMenuwhereif $0.location.x < 200defines that it will invoke drag only when finger is from0 to 200 on x Axis- To enable Left To right swipe we used
if ($0.location.x - $0.startLocation.x) > 0 {
Entertain only when Gesture ends i.e..onEnded {
2. ViewModel.swift
class ViewModel: ObservableObject {
    // Indicates Hamburgers visiblity
    @Published var isMenuVisible:Bool = false
}
3. SideBarMenu.swift
import SwiftUI
// HamburgerView
struct SideBarView:View {

    @EnvironmentObject var viewModel:ViewModel

    var body: some View {

        ZStack {
            if self.viewModel.isMenuVisible {
                Color.black.opacity(0.3)
                    .ignoresSafeArea()
                    .transition(.opacity)
                VStack(alignment: .leading) {
                    Image(systemName: "brain.head.profile")
                        .resizable()
                        .overlay(
                            Circle().stroke(Color.gray, lineWidth: 1))
                        .frame(width: 60, height: 60)
                        .clipShape(Circle())
                    Text("SwiftUI Menu")
                        .font(.largeTitle)
                    Text("You Did It")
                        .font(.caption)
                    Divider()

                    ScrollView {
                        ForEach((1...40), id: \.self) {
                            Text("Side Menu Index---> \($0)")
                        }
                    }
                    Divider()
                    Text("bottom")

                }
                .padding([.bottom, .top],50)
                .padding(.leading, 20)
                .frame(maxWidth:.infinity, maxHeight: .infinity)
                .background(Color.white)
                .cornerRadius(5)
                .padding(.trailing,50)
                .transition(
                    .asymmetric(
                        insertion: .move(edge: .leading),
                        removal: .move(edge: .leading)
                    )
                ).zIndex(1)  // to force keep at top
            }
        }
        .frame(maxWidth: .infinity, maxHeight: .infinity)
        .animation(.default, value: self.viewModel.isMenuVisible)  // << here !!
    }
}- Here i have created a List with top header icon which most generally used in Hamburgers Menu
if self.viewModel.isMenuVisible {Indicates show menu only id flag is ontransition(is used to define asymmetric for insertion & Removal.zIndex(1)for managing item at top of hierarchy- That’s All 🙂
Final Code is Available here